Welcome to zyc’s documentation!
zyc

A GUI utility for searching and selecting parts and footprints for use with SKiDL.
Free software: MIT license
Documentation: https://devbisme.github.io/zyc .
Features
Keyword search and selection of parts in KiCad libraries.
Keyword search and selection of footprints in KiCad libraries.
Copy-and-paste part instances into SKiDL code.
Credits
This package was created with Cookiecutter and the audreyr/cookiecutter-pypackage project template.
Installation
Stable release
To install zyc, run this command in your terminal:
$ pip install zyc
This is the preferred method to install zyc, as it will always install the most recent stable release.
If you don’t have pip installed, this Python installation guide can guide you through the process.
From sources
The sources for zyc can be downloaded from the Github repo.
You can either clone the public repository:
$ git clone git://github.com/devbisme/zyc
Or download the tarball:
$ curl -OL https://github.com/devbisme/zyc/tarball/master
Once you have a copy of the source, you can install it with:
$ python setup.py install
Usage
Just enter zyc at the command line to bring up the GUI.
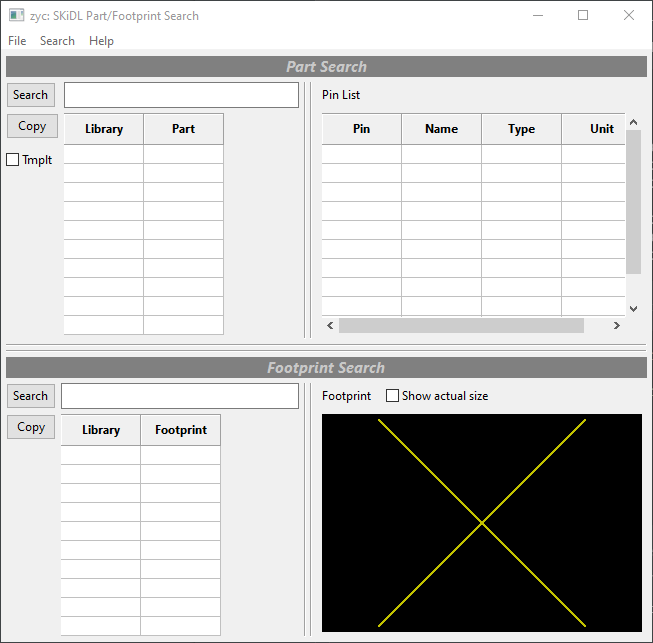
zyc has two, cooperating panes: a part is searched for and selected in the top pane, and then the
same is done for a footprint in the bottom pane. Then you can paste a SKiDL Part(...) instantiation
with the part and footprint into a code editing window.
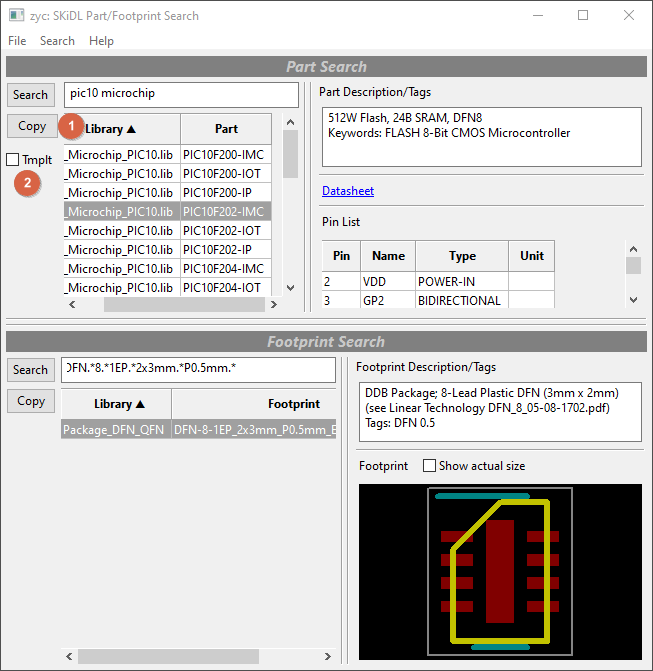
To begin, start off by typing some search terms describing the part you want
into the upper text-entry box (1) and hit RETURN or click the Search button (2).
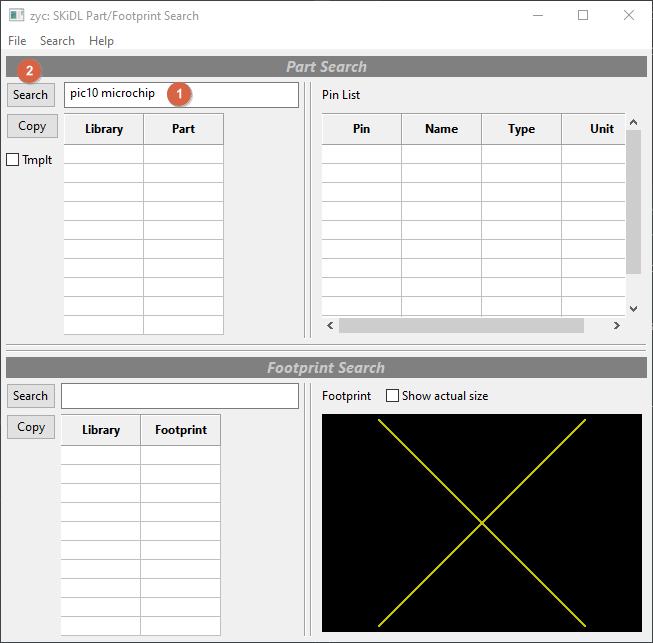
zyc will scan through all the available parts looking for your search terms in the library names and
the part names, aliases, descriptions, and keywords. (This initial search takes 20-30 seconds, but
any further searches are quick because the part data gets cached.)
The search terms can contain one or more text strings and/or regular expressions (REs).
Any matching parts are displayed in the Library/Part table (1).
Clicking on a row in the table (2) displays the part’s description and keywords (3), datasheet hyperlink (4), and
I/O pin table (5) on the right-side of the pane.
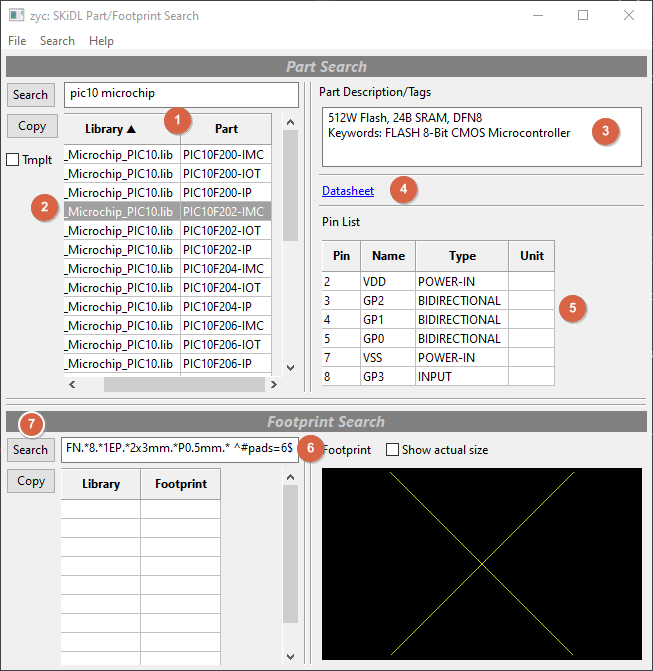
Selecting a part also loads the footprint search text-entry box (6) with an initial set of search terms formed from
the part’s list of recommended footprints plus the number of part pins.
You can edit these search terms and add more to modify the footprint search.
(Which is handy because, in this case, the number of pins is wrong since the pin list only contains
six entries but the actual number of pins is eight. So I’ll just remove it.)
Then press the Search button (7) to scan through all the footprints for matching terms.
(As with parts, the initial footprint search takes 20-30 seconds but further searches are fast
because of caching.)
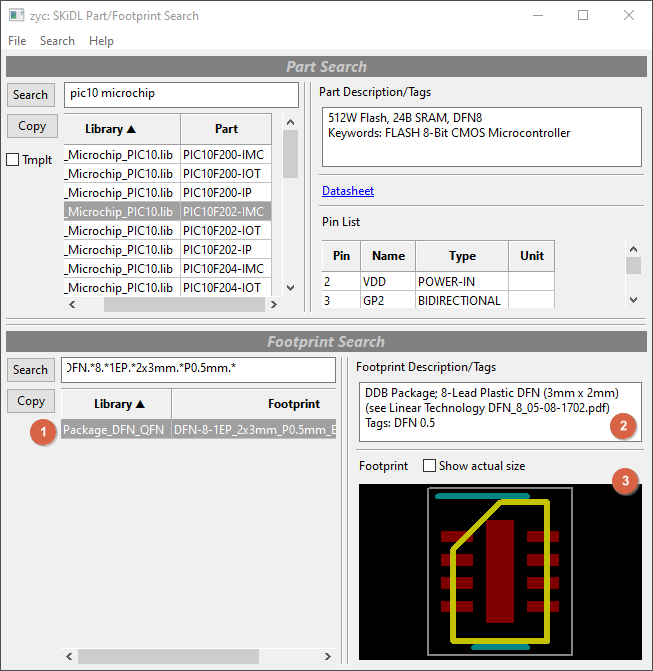
The footprints that match the search terms appear in the Library/Footprint table (1). In this case, there is only one. Selecting it makes the footprint description appear (2) as well as a drawing of the footprint (3). (If a hyperlink for the package datasheet was available, that would show up as well.)
Once a part and footprint are selected, you can click on the Copy button in the upper panel (1)
to place a Part(...) instantiation on the clipboard.
Then you can go anywhere (such as your code editor) and paste the clipboard contents to get the part instantiation:
uc = Part(lib='MCU_Microchip_PIC10.lib', name='PIC10F202-IMC',
          footprint='Package_DFN_QFN:DFN-8-1EP_2x3mm_P0.5mm_EP0.61x2.2mm')
If you check the Tmplt box (2) and then click the Copy button, a part template (instead of an instance)
gets placed on the clipboard and appears as follows:
uc = Part(lib='MCU_Microchip_PIC10.lib', name='PIC10F202-IMC', dest=TEMPLATE,
          footprint='Package_DFN_QFN:DFN-8-1EP_2x3mm_P0.5mm_EP0.61x2.2mm')
To make it easier to connect the pins, zyc lets you select the names from the pin list column (1).
Right-clicking on the table copies whatever is selected to the clipboard.
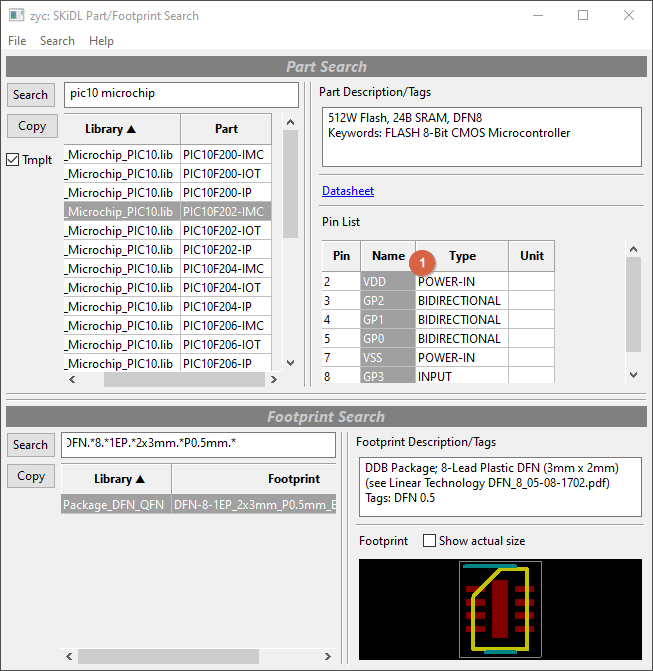
Then the pin names can be pasted into the code editor:
uc = Part(lib='MCU_Microchip_PIC10.lib', name='PIC10F202-IMC',
          footprint='Package_DFN_QFN:DFN-8-1EP_2x3mm_P0.5mm_EP0.61x2.2mm')
"VDD",
"GP2",
"GP1",
"GP0",
"VSS",
"GP3"
Now you can use the strings to connect the microcontroller pins to various nets:
uc = Part(lib='MCU_Microchip_PIC10.lib', name='PIC10F202-IMC',
          footprint='Package_DFN_QFN:DFN-8-1EP_2x3mm_P0.5mm_EP0.61x2.2mm')
uc["VDD", "VSS"] += Net('VCC'), Net('GND')
uc["GP0", "GP1", "GP2", "GP3"] += Bus('GP', 4)
zyc lets you double-click on any table column header to re-sort the table
based on the contents of that column.
This can be useful in grouping pins by their names, functions, or part units
before selecting and pasting them.
Using an FPGA as an example, double-clicking the Unit column (1)
orders the table so you can select all the I/O pins in one of its banks (2).
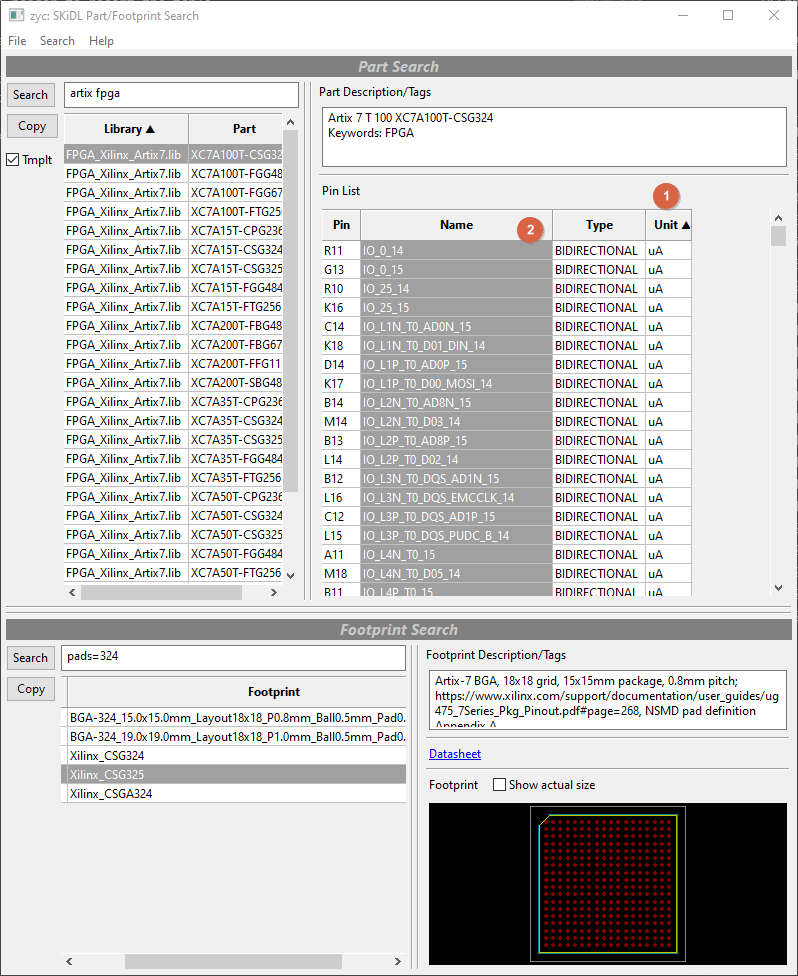
Then the pins can be pasted:
"IO_0_14",
"IO_0_15",
"IO_25_14",
"IO_25_15",
"IO_L1N_T0_AD0N_15",
"IO_L1N_T0_D01_DIN_14",
"IO_L1P_T0_AD0P_15",
"IO_L1P_T0_D00_MOSI_14",
"IO_L2N_T0_AD8N_15",
"IO_L2N_T0_D03_14",
"IO_L2P_T0_AD8P_15",
"IO_L2P_T0_D02_14",
"IO_L3N_T0_DQS_AD1N_15",
"IO_L3N_T0_DQS_EMCCLK_14",
"IO_L3P_T0_DQS_AD1P_15",
"IO_L3P_T0_DQS_PUDC_B_14",
"IO_L4N_T0_15",
"IO_L4N_T0_D05_14",
"IO_L4P_T0_15",
"IO_L4P_T0_D04_14",
"IO_L5N_T0_AD9N_15",
"IO_L5N_T0_D07_14",
"IO_L5P_T0_AD9P_15",
"IO_L5P_T0_D06_14",
"IO_L6N_T0_D08_VREF_14",
"IO_L6N_T0_VREF_15",
"IO_L6P_T0_15",
"IO_L6P_T0_FCS_B_14",
"IO_L7N_T1_AD2N_15",
"IO_L7N_T1_D10_14",
"IO_L7P_T1_AD2P_15",
"IO_L7P_T1_D09_14",
"IO_L8N_T1_AD10N_15",
"IO_L8N_T1_D12_14",
"IO_L8P_T1_AD10P_15",
"IO_L8P_T1_D11_14",
"IO_L9N_T1_DQS_AD3N_15",
"IO_L9N_T1_DQS_D13_14",
"IO_L9P_T1_DQS_14",
"IO_L9P_T1_DQS_AD3P_15",
"IO_L10N_T1_AD11N_15",
"IO_L10N_T1_D15_14",
"IO_L10P_T1_AD11P_15",
"IO_L10P_T1_D14_14",
"IO_L11N_T1_SRCC_14",
"IO_L11N_T1_SRCC_15",
"IO_L11P_T1_SRCC_14",
"IO_L11P_T1_SRCC_15",
"IO_L12N_T1_MRCC_14",
"IO_L12N_T1_MRCC_15",
"IO_L12P_T1_MRCC_14",
"IO_L12P_T1_MRCC_15",
"IO_L13N_T2_MRCC_14",
"IO_L13N_T2_MRCC_15",
"IO_L13P_T2_MRCC_14",
"IO_L13P_T2_MRCC_15",
"IO_L14N_T2_SRCC_14",
"IO_L14N_T2_SRCC_15",
"IO_L14P_T2_SRCC_14",
"IO_L14P_T2_SRCC_15",
"IO_L15N_T2_DQS_ADV_B_15",
"IO_L15N_T2_DQS_DOUT_CSO_B_14",
"IO_L15P_T2_DQS_15",
"IO_L15P_T2_DQS_RDWR_B_14",
"IO_L16N_T2_A15_D31_14",
"IO_L16N_T2_A27_15",
"IO_L16P_T2_A28_15",
"IO_L16P_T2_CSI_B_14",
"IO_L17N_T2_A13_D29_14",
"IO_L17N_T2_A25_15",
"IO_L17P_T2_A14_D30_14",
"IO_L17P_T2_A26_15",
"IO_L18N_T2_A11_D27_14",
"IO_L18N_T2_A23_15",
"IO_L18P_T2_A12_D28_14",
"IO_L18P_T2_A24_15",
"IO_L19N_T3_A09_D25_VREF_14",
"IO_L19N_T3_A21_VREF_15",
"IO_L19P_T3_A10_D26_14",
"IO_L19P_T3_A22_15",
"IO_L20N_T3_A07_D23_14",
"IO_L20N_T3_A19_15",
"IO_L20P_T3_A08_D24_14",
"IO_L20P_T3_A20_15",
"IO_L21N_T3_DQS_A06_D22_14",
"IO_L21N_T3_DQS_A18_15",
"IO_L21P_T3_DQS_14",
"IO_L21P_T3_DQS_15",
"IO_L22N_T3_A04_D20_14",
"IO_L22N_T3_A16_15",
"IO_L22P_T3_A05_D21_14",
"IO_L22P_T3_A17_15",
"IO_L23N_T3_A02_D18_14",
"IO_L23N_T3_FWE_B_15",
"IO_L23P_T3_A03_D19_14",
"IO_L23P_T3_FOE_B_15",
"IO_L24N_T3_A00_D16_14",
"IO_L24N_T3_RS0_15",
"IO_L24P_T3_A01_D17_14",
"IO_L24P_T3_RS1_15"
This is definitely something that would be difficult to type manually without making a mistake!
zyc requires minimal setup.
By default, it will use the KICAD_SYMBOL_DIR environment variable to look for part libraries,
and it will look for the global footprint library table (fp_lib_table) in the default location
where KiCad installs it on various OSes.
You can also add or change the directories that are searched for part libraries (1) or for
fp_lib_table files (2) using the menu items below:
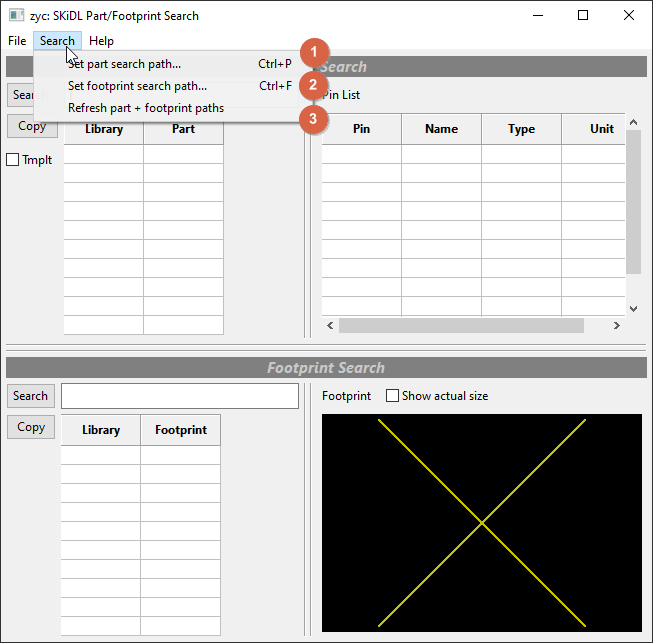
It may happen that you change some part libraries or add more footprint files while zyc is
running. If so, you’ll want to refresh the part and footprint caches (3).
Contributing
Contributions are welcome, and they are greatly appreciated! Every little bit helps, and credit will always be given.
You can contribute in many ways:
Types of Contributions
Report Bugs
Report bugs at https://github.com/devbisme/zyc/issues.
If you are reporting a bug, please include:
Your operating system name and version.
Any details about your local setup that might be helpful in troubleshooting.
Detailed steps to reproduce the bug.
Fix Bugs
Look through the GitHub issues for bugs. Anything tagged with “bug” and “help wanted” is open to whoever wants to implement it.
Implement Features
Look through the GitHub issues for features. Anything tagged with “enhancement” and “help wanted” is open to whoever wants to implement it.
Write Documentation
zyc could always use more documentation, whether as part of the official zyc docs, in docstrings, or even on the web in blog posts, articles, and such.
Submit Feedback
The best way to send feedback is to file an issue at https://github.com/devbisme/zyc/issues.
If you are proposing a feature:
Explain in detail how it would work.
Keep the scope as narrow as possible, to make it easier to implement.
Remember that this is a volunteer-driven project, and that contributions are welcome :)
Get Started!
Ready to contribute? Here’s how to set up zyc for local development.
Fork the zyc repo on GitHub.
Clone your fork locally:
$ git clone git@github.com:your_name_here/zyc.git
Install your local copy into a virtualenv. Assuming you have virtualenvwrapper installed, this is how you set up your fork for local development:
$ mkvirtualenv zyc
$ cd zyc
$ python setup.py develop
Create a branch for local development:
$ git checkout -b name-of-your-bugfix-or-feature
Now you can make your changes locally.
Commit your changes and push your branch to GitHub:
$ git add .
$ git commit -m "Your detailed description of your changes."
$ git push origin name-of-your-bugfix-or-feature
Submit a pull request through the GitHub website.
Pull Request Guidelines
Before you submit a pull request, check that it meets these guidelines:
If the pull request adds functionality, the docs should be updated. Put your new functionality into a function with a docstring, and add the feature to the list in README.rst.
The pull request should work for Python 2.7 and >=3.5.
History
1.0.0 (2021-09-16)
Disabled creation of SKiDL logging and ERC files.
Decided this tool was mature to the point it could be called 1.0.0.
0.4.0 (2020-09-20)
Fixed infinite recursion caused by search that returns an entire list of invalid footprints (issue #2).
0.3.0 (2020-06-07)
Fixed copy-paste part/footprint errors caused by clipboard already being open.
0.2.0 (2020-04-28)
Replaced sorting function deleted from SKiDL.
Updated some Grid definitions for wxpython 4.0.
0.1.0 (2019-12-17)
Extracted zyc utility from SKiDL repo and released separately on PyPi.